[TIL] 데이터분석 데브코스 74일차 - 워드 임베딩(Word Embedding)/벡터 DB/LangChain/RAG/QA 챗봇 만들기 실습
Word Embedding(워드 임베딩)
: 문장을 단어의 리스트로 바꾸고(토큰화), 각 토큰을 숫자(벡터 or 행렬)로 변환하는 과정
대표적 사전 훈련된 워드 임베딩 모델
- Word2Vec
- GloVe
- FastText
- OpenAI Embedding
방법1. Bag of Words
: One-hot Encoding을 사용하여 단어별로 인덱스를 지정하거나, (문장의 경우) 문장 내 단어들의 인덱스와 빈도수를 저장하는 방법
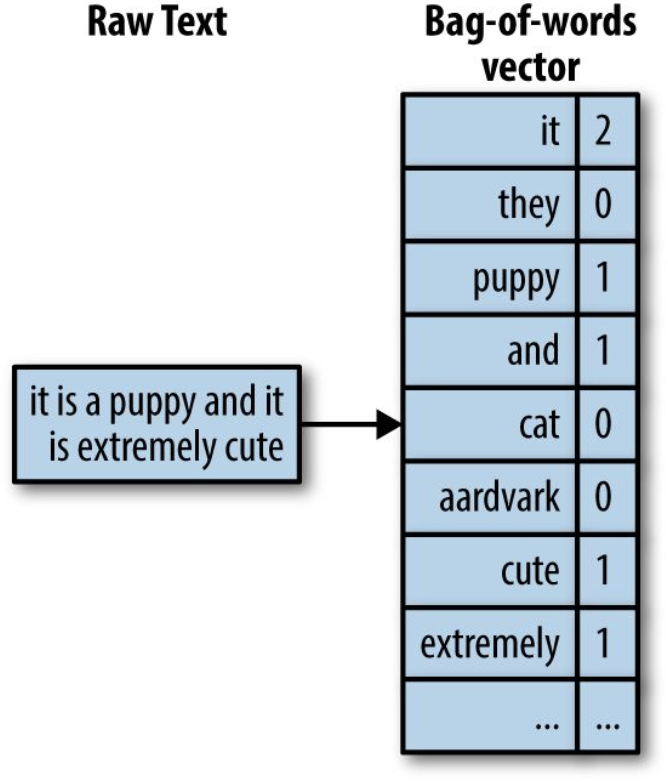
- 크기는 크지만 밀도는 낮은(sparse한) 벡터가 됨
- 영어의 경우 2만개 단어가 사용됨
- 문맥이 존재하지 않기 때문에 단어들의 관계 및 순서가 전혀 표현되지 못함
- 일반적으로 3개의 특수 단어가 존재
- 1) SOS : Start of Sentence
- 2) EOS : End of Sentence
- 3) UNKNOWN : 모르는 단어
방법2. Word Embedding
: N개의 단어들 간 관계를 학습해서 보다 적은 차원(Dimensionality Reduction)으로 단어를 표현해주는 딥러닝 모델
- 모든 NLP 처리 딥러닝의 첫 번째 레이어로 존재함
- Pre-trained된 버전을 사용하면 됨
- 학습 시 사용하는 대표 모델
- CBOW(Continuous Bag of Words), Skip-gram
- Encoder-Decoder Architecture
AutoEncoder : Encoder-Decoder
: 입력을 저차원으로 압축한 후, 이를 원본 데이터와 유사하게 복원하는 비지도학습을 위한 딥러닝 모델
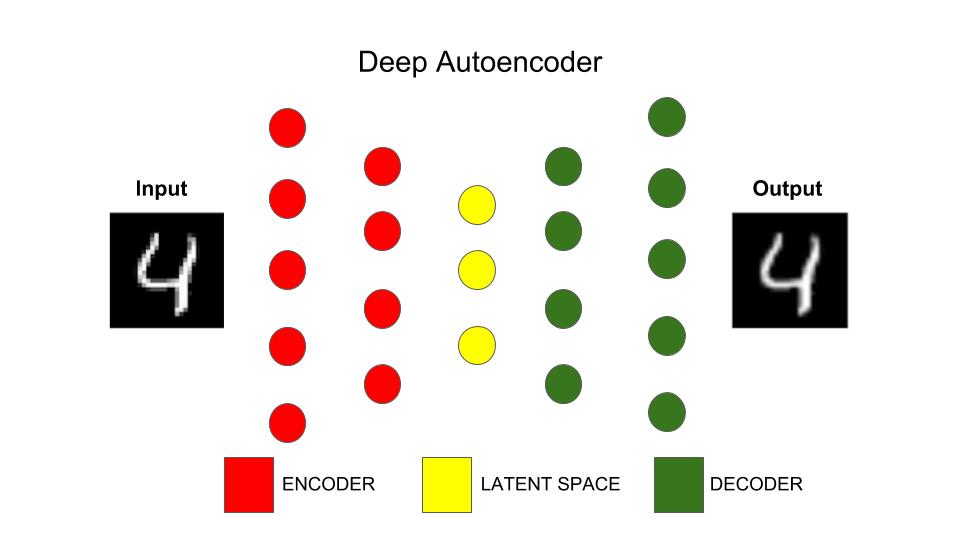
- 목표 : 데이터의 숨겨진 구조를 발견하면서 노드의 수를 줄이는 것
- 입력 데이터에서 불필요한 특징들을 제거하는 것을 학습
- 입력 = 레이블(예상 출력 데이터)
- 출력 = 입력을 재구축한 형태
- Encoder(=입력 레이어 + 은닉층) : 입력을 낮은 차원으로 압축해주는 기능
- Decoder(=은닉층 + 출력 레이어) : 압축된 정보를 원본으로 복원해주는 기능
워드 임베딩 적용 프로세스
단어 입력 → Word Embedding Layer → 단어 벡터
- 입력 : 2차원 Tensor (문장 수, 문장 길이)
- 각 문장의 길이는 모든 문장에 대해 동일해야하므로 `keras.preprocessing.sequence` 모듈의 `pad_sequences`함수 사용
- 문장의 수는 보통 배치(batch) 크기에 의해 결정됨
- 출력 : 3차원 Tensor(문장 수, 문장 길이, 임베딩 차원)
HuggingFace로 워드 임베딩 실습
HuggingFace의 계정을 통해서 API 사용을 위한 토큰을 만들어야 한다.
model_id = "sentence-transformers/all-MiniLM-L6-v2"
# get your token in http://hf.co/settings/tokens"
hf_token = "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"
API를 호출해보자.
import requests

api_url = f"https://api-inference.huggingface.co/pipeline/feature-extraction/{model_id}"
headers = {"Authorization": f"Bearer {hf_token}"}
문장 단위 임베딩을 해주는 함수를 정의한다.
def query(texts):
    response = requests.post(api_url, headers=headers, json={"inputs": texts, "options":{"wait_for_model":True}})
    return response.json()
texts = ["How do I get a replacement Medicare card?",
        "What is the monthly premium for Medicare Part B?",
        "How do I terminate my Medicare Part B (medical insurance)?",
        "How do I sign up for Medicare?",
        "Can I sign up for Medicare Part B if I am working and have health insurance through an employer?",
        "How do I sign up for Medicare Part B if I already have Part A?",
        "What are Medicare late enrollment penalties?",
        "What is Medicare and who can get it?",
        "How can I get help with my Medicare Part A and Part B premiums?",
        "What are the different parts of Medicare?",
        "Will my Medicare premiums be higher because of my higher income?",
        "What is TRICARE ?",
        "Should I sign up for Medicare Part B if I have Veterans' Benefits?"]

output = query(texts)
len(output)
len(output[0])
len(output[4])
len(output[12])
output[0]
이번에는 단어 단위 임베딩을 해보자.
BERT계열의 bert-base-uncased를 사용해서 단어 단위 임베딩을 수행할 수 있다.
model_id = 'bert-base-uncased'
api_url = f"https://api-inference.huggingface.co/pipeline/feature-extraction/{model_id}"
headers = {"Authorization": f"Bearer {hf_token}"}
위의 문장을 그대로 입력으로 취한다.
(1, 단어의 수, 임베딩 차원 수) = (1, 11, 768)
output = query(texts)

len(output[0]) # 배치의 크기가 되며 이는 디폴트로 하나씩 처리가 됨
len(output[0][0]) # 첫 번째 문장은 SOS와 EOS 포함하여 11개의 단어로 구성됨
len(output[0][0][0]) # 각 단어는 768 차원의 벡터로 표현이 됨
Gensim으로 워드 임베딩 시각화 실습
실습 목표
1. 비슷한 단어 찾기 : obama, trump, banana
2. 반대 단어 찾기 : banana
3. 단어 간 관계로 연관 단어 찾기 :
- woman : king=man : ?
- japan : korean = korea : ?
모델을 다운로드 받는다.
import gensim.downloader as api

wv = api.load('word2vec-google-news-300')
import gensim.downloader as api
import numpy as np
from sklearn.manifold import TSNE
import matplotlib.pyplot as plt

# Select a subset of words from the model's vocabulary
words = [ "king", "queen", "man", "woman", "lion", "tiger", "red", "orange"]
word_vectors = np.array([wv[word] for word in words])

# Use t-SNE to reduce the dimensionality of the word vectors to 2D
tsne = TSNE(n_components=2, random_state=0, perplexity=5)
word_vectors_2d = tsne.fit_transform(word_vectors)
print(words)
print(word_vectors_2d)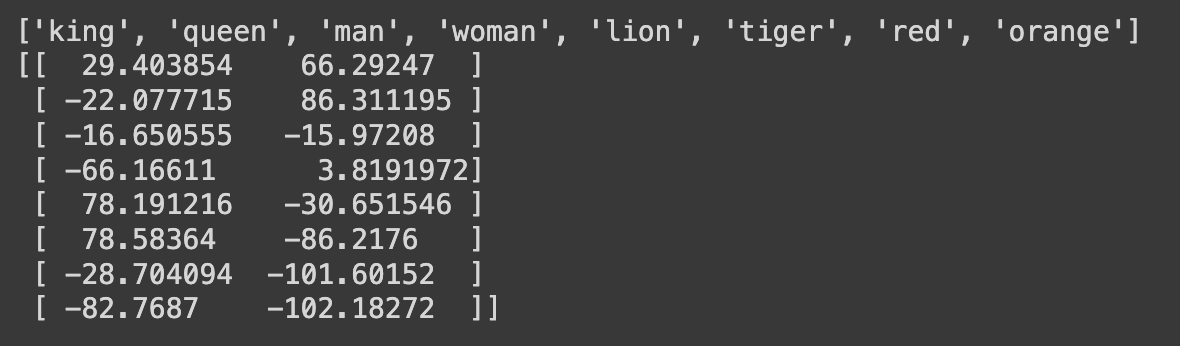
# Visualize the word vectors in 2D space
plt.figure(figsize=(10, 10))
for i, word in enumerate(words):
    plt.scatter(word_vectors_2d[i, 0], word_vectors_2d[i, 1])
    plt.annotate(word, xy=(word_vectors_2d[i, 0], word_vectors_2d[i, 1]),
                 xytext=(5, 2), textcoords='offset points', ha='right', va='bottom')
plt.show()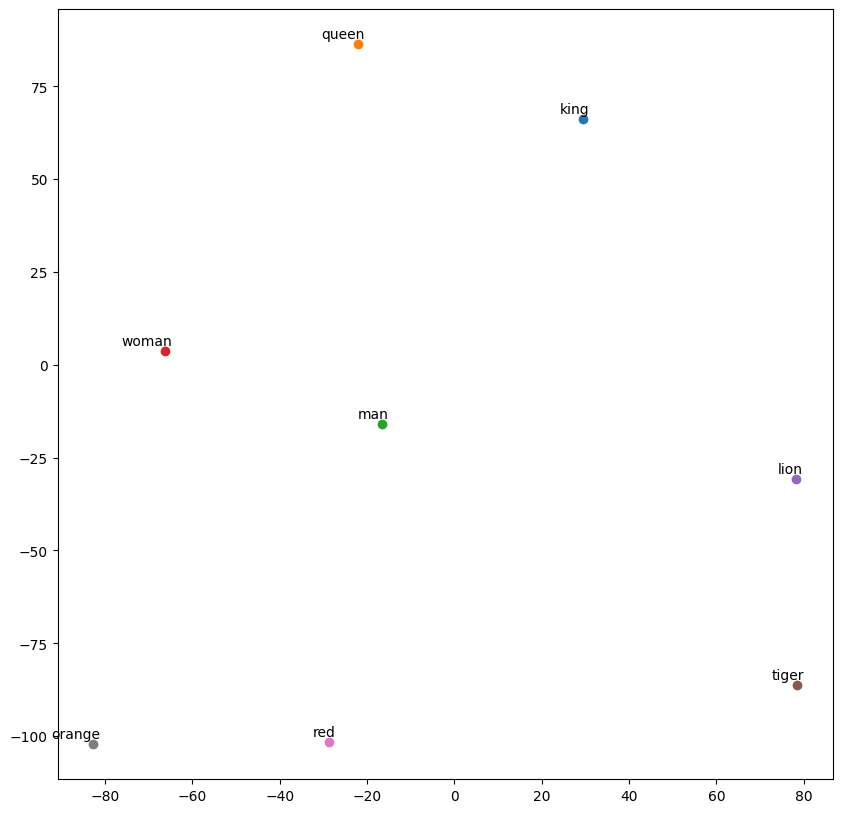
similar_words = wv.most_similar('computer', topn=5)
print(similar_words)
[('computers', 0.7979379892349243), ('laptop', 0.6640493273735046), ('laptop_computer', 0.6548868417739868), ('Computer', 0.647333562374115), ('com_puter', 0.6082080006599426)]
# Solve the analogy:
analogy_result = wv.most_similar(positive=['woman', 'king'], negative=['man'], topn=3)
print(analogy_result)
# Solve the analogy
analogy_result = wv.most_similar(positive=['female', 'tiger'], negative=['male'], topn=3)
print(analogy_result)
# Solve the analogy
analogy_result = wv.most_similar(positive=['japan', 'korean'], negative=['korea'], topn=3)
print(analogy_result)
similar_words = wv.most_similar('obama', topn=5)
print(similar_words)
[('mccain', 0.7319012880325317), ('hillary', 0.7284600138664246), ('obamas', 0.7229632139205933), ('george_bush', 0.7205674648284912), ('barack_obama', 0.7045838832855225)]
similar_words = wv.most_similar('banana', topn=5)
print(similar_words)
[('bananas', 0.7523775696754456), ('pineapple', 0.6587537527084351), ('mango', 0.6365211009979248), ('pineapples', 0.6313878297805786), ('papaya', 0.6063665747642517)]
🤔 기존 검색 방식의 문제점
- 검색에 사용한 정확한 단어가 나오지 않는다면 좋은 결과가 나오지 않음
- 텍스트 검색밖에 지원하지 못함
↓ (해결)
벡터 데이터베이스(Vector Database)
- 임베딩을 사용해서 데이터 차원 축소 가능
- 의미적인 검색 가능
- 다양한 타입 동시에 지원 → 멀티 모달(텍스트, 이미지, 오디오) 검색 가능
벡터 DB의 유스케이스
- Semantic 검색 : 단순 키워드 매칭이 아닌 사용자 의도에 맞는 검색 결과를 보여줌
- 유사 검색
- LLM 보조를 위한 Long-term 메모리 (RAG)
- 추천 시스템
- 머신러닝 : 클러스터링, 분류 시스템
- 이상 탐지
Pinecone
: 벡터 임베딩을 활용하여 유사한 콘텐츠 검색 구현을 쉽게 가능하게 해주는 클라우드 서비스
RAG
: LLM의 지식을 그대로 활용하되, 특정 도메인의 지식을 구체화 및 체계화한 프롬프트의 일부로 넘겨주는 형태
LangChain
: 간단한 것부터 복잡한 것까지 RAG 애플리케이션 빌딩 블록을 제공하는 서비스
LangChain 기반 QA 챗봇 만들기 실습
실습 목표
- HuggingFace databricks-dolly-15k 데이터셋을 도메인 정보로 사용
- 베이스 LLM 모델 : HuggingFaceHub의 google/fan-t5-xxl
- flan-t5-xxl 모델의 대화능력 + databricks-dolly-15k의 도메인 정보 → 프롬프트에 벡터 DB형태로 넘김
- LangChain
- transformers
- sentence-transformers
- faiss-cpu
Retrievers : faiss 벡터 DB를 가리키는 포인터 → 벡터 DB에서 검색 가능
다양한 모듈들을 설치해보자.
!pip install -q langchain
!pip install -q torch
!pip install -q transformers
!pip install -q sentence-transformers
!pip install -q datasets
!pip install -q faiss-cpu
실습에 필요한 python 모듈도 불러온다.
from langchain.text_splitter import RecursiveCharacterTextSplitter
from langchain.embeddings import HuggingFaceEmbeddings
from langchain.vectorstores import FAISS
from transformers import AutoTokenizer, pipeline
from langchain import HuggingFacePipeline
from langchain.chains import RetrievalQA
Langchain Document에서 데이터를 로드하자.
from langchain.document_loaders import HuggingFaceDatasetLoader

# Specify the dataset name and the column containing the content
# - https://huggingface.co/datasets
dataset_name = "databricks/databricks-dolly-15k"
page_content_column = "context"  # or any other column you're interested in

# Create a loader instance
loader = HuggingFaceDatasetLoader(
    dataset_name,
    page_content_column
)

# Load the data
data = loader.load()

# Display the first entry
data[0]
len(data)
문서를 Chunk로 바꿔보자.
text_splitter = RecursiveCharacterTextSplitter(chunk_size=1000, chunk_overlap=150)

docs = text_splitter.split_documents(data[:1000])

docs[0]
위와 동일한 내용으로 나오게 된다.
이 chunk를 벡터로 임베딩해보자. 임베딩할 수 있는 변수를 만들어서 진행한다.
# Define the path to the pre-trained model you want to use
modelPath = "sentence-transformers/all-MiniLM-l6-v2"

# Create a dictionary with model configuration options,
# specifying to use the cuda for computations
# Runtime -> "Change runtime type"
model_kwargs = {'device':'cpu'}

# Create a dictionary with encoding options, specifically setting 'normalize_embeddings' to False
encode_kwargs = {'normalize_embeddings': False}

# Initialize an instance of HuggingFaceEmbeddings with the specified parameters
embeddings = HuggingFaceEmbeddings(
    model_name=modelPath,     # Provide the pre-trained model's path
    model_kwargs=model_kwargs, # Pass the model configuration options
    encode_kwargs=encode_kwargs # Pass the encoding options
)
text = "This is a test document."
query_result = embeddings.embed_query(text)

len(query_result)
query_result[:3]
FAISS 벡터 스토어를 사용해서 임베딩한 결과를 저장하고 효율적으로 검색할 수 있도록 하는 데이터베이스를 만들어보자.
# gpu(cuda)로 설정했을 때 24초 걸림
db = FAISS.from_documents(docs, embeddings)
자연어로 된 질문을 넣어보고 결과 개수를 파악해보자.
question = "Who is Thomas Jefferson?"
searchDocs = db.similarity_search(question)

len(searchDocs)
첫번째 페이지의 결과를 출력해보자.
print(searchDocs[0].page_content)"Thomas Jefferson (April 13, 1743 \u2013 July 4, 1826) was an American statesman, diplomat, lawyer, architect, philosopher, and Founding Father who served as the third president of the United States from 1801 to 1809. Among the Committee of Five charged by the Second Continental Congress with authoring the Declaration of Independence, Jefferson was the Declaration's primary author. Following the American Revolutionary War and prior to becoming the nation's third president in 1801, Jefferson was the first United States secretary of state under George Washington and then the nation's second vice president under John Adams."
이제 벡터DB에 접근할 수 있는 Retreiver을 만들어보자.
Retreiver : 쿼리에서 문서를 반환하는 인터페이스
retriever=db.as_retriever(search_kwargs={"k": 3}) # k=3 : 최대 3개의 결과를 출력해서 이를 기반으로 프롬프트를 만들어라
docs = retriever.get_relevant_documents("What is Cheesemaking?")
print(docs[0].page_content)
"A grilled cheese sandwich is made by placing a cheese filling, often cheddar or American cheese, between two slices of bread, which is then heated until the bread browns and the cheese melts. A layer of butter or mayonnaise may be added to the outside of the bread for additional flavor and texture. Alternatives may include additional ingredients, such as meat, peppers, tomatoes, or onions. Methods for heating the sandwich include cooking on a griddle, fried in a pan, or using a panini grill or sandwich toaster, the latter method more common in the United Kingdom, where the sandwiches are normally called \"toasted sandwiches\" or \"toasties\", in Australia, where they are called \"jaffles\" or \"toasted sandwiches\", and South Africa, where they are called \u201csnackwiches\u201d. Other methods include baking in an oven or toaster oven \u2014 or in a toasting bag in an electric toaster."
HuggingFaceHub를 이용해서 google/flan-t5-xxl 모델을 API를 통해 호출할 수 있도록 설정해보자.
import os
os.environ["HUGGINGFACEHUB_API_TOKEN"] = ""
from langchain import HuggingFaceHub
from langchain.chains.question_answering import load_qa_chain

llm=HuggingFaceHub(
    repo_id="google/flan-t5-xxl",
    model_kwargs={"temperature":0.1, "max_length":512}
)
chain = load_qa_chain(llm, chain_type="stuff")
- `llm.invoke()` : 파인튜닝 혹은 별도의 프롬프트 정보 없이 언어 모델의 기능을 있는 그대로 사용 가능하게 하는 함수
question = "Who is Thomas Jefferson?"
# run the query directly against google/flan-t5-xxl
llm.invoke(question)
# run the query via Vector DB
docs = db.similarity_search(question)
chain.run(input_documents=docs, question=question)
llm.invoke("What is the source of cheese?")
위의 과정을 한번에 하고싶다면 QA pipeline을 생성한 다음, 추가적으로 모델별 인수를 사용하여 LangChain pipeline을 생성하면 된다.
from langchain.chains import RetrievalQA

qa = RetrievalQA.from_chain_type(
    llm=llm,
    chain_type="stuff",
    retriever=retriever,
    verbose=True,
    chain_type_kwargs={
        "verbose": True,
    }
)


qa.run("Who is Thomas Jefferson")